

Introduction
After General Guide To Leader Abilities In Gwent, we have moved into more detailed breakdown, faction-by-faction, following the alphabetical order:
This time we visit Skellige. Each leader ability would be accompanied by a short characteristics, the most important synergies (importance rated with stars) and example decks.
All demo decks presented in the series could also be found in a Google Sheet.
Onslaught
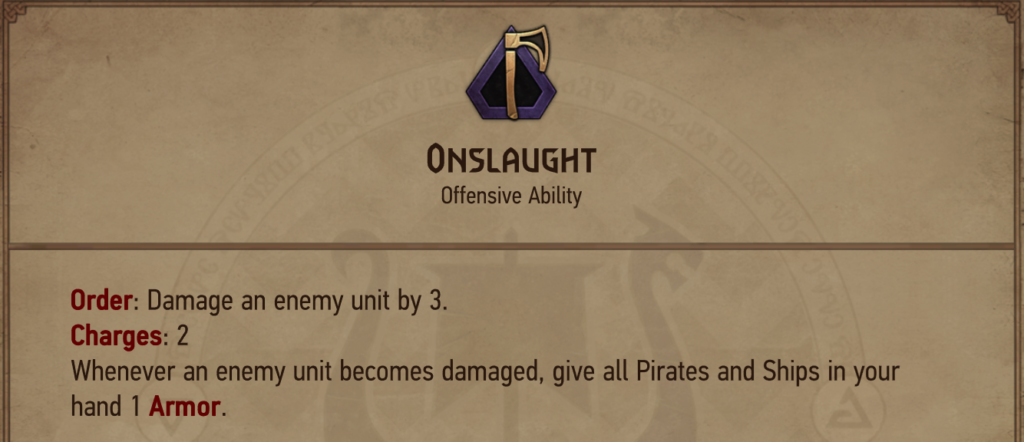
Onslaught is a control and synergistic leader ability (6 raw points).
- Damage Removal Support *** | Onslaught itself could at best remove one 4+ power threat, while 7+ power would survive. With the support of damage cards, removal reach is higher and Onslaught likely helps to remove two threats during the game. Compared with another leader with similar synergy – Precision Strike (Scoia’tael) – Onslaught has way less raw points; against high floor pointslam decks other synergies are required to win.
- Ship/Pirate Armor Payoff *** | To make up for low raw points, the armor developed on Pirates/Ship should let them play above power vs provision curve. The excess value in total should be at least ~6 points. Armor could protect engines (Crach An Craite, An Craite Longship…) or be transferred directly into value (Terror of the Seas, Yustianna…).
- Anti-Damage Value ** | Outside engine protection, If all units played in the round are armored, then extra effective value is developed on the opponent’s damage cards.
- Pointslam Balance ** | Onslaught leader ability is generally weak in a short round; to make up for this weakness at least one strong point slam high end card is useful for Round 3.
- Round Control ** | Onslaught could often win engine skirmish by deploying own engines protected with armor and removing the opponent’s threats with leader charges. Such an advantage is best exploited in a long round.
- Thinning * | As Onslaught armors only the units drawn to hand, in order to find crucial cards scaling with armor in time, as much thinning as possible is needed.
Onslaught is a leader justified in decks which make use of both active and passive part of the leader ability. While there is some freedom with respect to the choice of particular cards, the general strategy of Onslaught decks is usually very similar to each other.
Demo decks:
- Onslaught Svalblod Sove – Pirates/Ships scaffold in this version is topped with Svalblod + Sove high-end, which is better tempo and less conditional than Hjalmar: Seawolf or The Endless Voyage (Gwent 11.11)
- Onslaught Hjalmar Sukrus Cheese – Showcases the armoring aspect of Onslaught – Covenant Of Steel and Sukrus are harder to remove and Hjalmar:Seawolf passive could bring formidable value. This list of threat overload type – feel free to commit The Endless Voyage in Round 1, because getting round control is of utmost importance in this list and many cards play for very low tempo when defending push.
- Onslaught Devotion Wariates Raids – (Warriors + Pirates = Wariates). Bjorn Stromusson and Yustianna an Craite are high-end Veteran cards in the Pirates archetype. They benefit from Bran Tuirseach, potentially by +2. Highland Warlords not only improve Abordage, but also increase Naval Supremacy damage – use with caution.
- Onslaught Nekker Warships (meme) – Golden Nekker provides pointslam balance. Deck plays even more Pirates than usual in order to trigger Dimun Warship ability. Sometimes Bear Wticher Quartermaster could be used to help to bring Warships down to zero.

Reckless Flurry
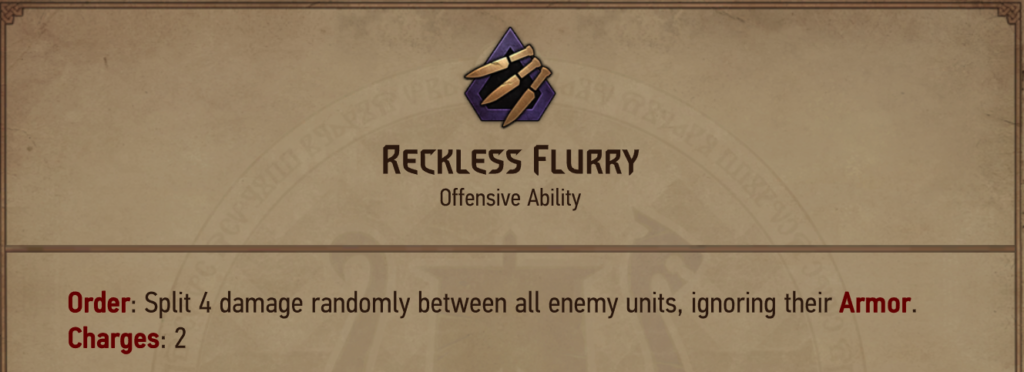
Reckless Flurry is a mix of control and pointslam leader ability (8 raw points) with a limited number of synergies. In order to be justified, Reckless Flurry must provide control value – help to remove at least one threat.
- Pings To Control *** | Chaotic Reckless Flurry blows should be harnessed to help to remove desired threats on the opponent’s board. To achieve it, some removal support is useful; small damage to finish units damaged with RF, high damage to remove units screening possible RF use in later turns. Efficient damage / removal cards shine with RF (for example Shupe with possibilities of: Mage into seize/random damage, Hunter into 3×3 damage/destroy random opponent, Knight with 4p damage to finish a threat).
- Points + Control *** | Unlike Onslaught, Reckless Flurry offers little to support its own engine play and the common class going with RF is pointslam + control. Preventing the opponent from engine play without playing into control yourself is the main strategy.
- Killing Immune / Armored Units ** | RF is not targeted and ignores armor, which situationally makes this leader great against Immune / high armor low power units.
- Instant Damage Payoff * | An Craite Greatswords and Dagur Two Blades could be instantly triggered with RF.
Demo decks:
- Reckless Flurry Shupe Compass Into Lippy – Reckless Flurry helps to counter opponent’s engines during the first plays and get ahead in points when necessary. The main point of the deck is putting the pressure on the opponent with high tempo and strong gold plays in Round 1 and then retrieving best cards with Magic Compass into Lippy. Troll Porter is an immanent part of the thinning package in this build – he is needed to thin enough for Compass into Lippy play in Round 2.
- Reckless Flurry Devotion Warriors GS – Reckless Flurry here is supported with efficient damage cards (‘Pings To Control’, ‘Points + Control’). While there are little upsides compared with Blaze of Glory / Patricidal Fury Warriors, the build is still good under RF.
- Reckless Flurry Greatswords Dagur Nekker – Reckless Flurry synergy with Dagur and Greatswords makes them more convenient. This deck is an engine overload, untypical for Reckless Flurry.

Battle Trance
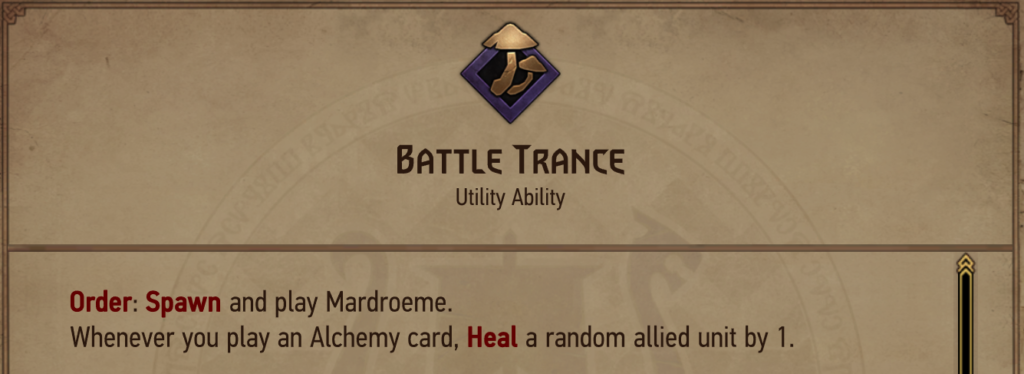
A synergistic leader ability. The active part of the leader ability is worth 6 raw points, while the passive is complex and possibly worth zero in decks not running specific packages. To develop consistent value from the passive, self-wounding cards have to play on power vs provision curve and so should Alchemy cards played along with them.
Spawning and playing Mardroeme forces going tall; compared with Toussaint Hospitality (Nillfgaard leader abilities) and Buhurt, at least 4 power target is needed on own side of the board. All BT leader ability power is located on one card, while Buhurt puts a part of power on +3 boost to opponent’s unit. Moreover, Toussaint Hospitality passive has a direct synergy with the main enemy boost strategy, while Mardroeme has no synergy with Heal.
In order to be playable, BT must develop huge points from synergies; otherwise the leader ability is underwhelming
- Mardroeme target *** | Mardroeme could have up to ~12 points ceiling when used on a proper unit (Dracoturtle, Sigvald). The drawback is that such a target usually is forced to go tall and trades very badly with tall punish. The biggest starter threat is Mardroeme into Sigvald, which opens Knut the Callous, Bekker’s Dark Mirror or Kaer Trolde follow up. No other leader ability in Skellige synergizes so well with Sigvald, but such strategy is extremely greedy and fails to a single tall punish.
- Crow Clan Preachers *** | Crow Clan Preachers are bronze Skellige engines with a distinctive +2 scaling for each Alchemy cards played if bonded. No other 4p SK engine could match such a ceiling. Crow Clan Preachers are definers of the Alchemy archetype. Mardroeme effective value is increased by 2 for each bonded Preacher active on the board.
- Protection ** | Mardroeme could protect a unit from damage. Compared with Carapace or Shieldwall, Battle Trance is obviously inferior and less flexible in this application. Against a single tall removal such protection is counterproductive when used on the main target, but may be still considerable on one of secondary threats. In practice it is sometimes correct to instantly protect a Crow Clan Preacher with Mardroeme to secure bonded in later turns rather than greeding the leader for pure value.
- Self-wounding Cards ** | Both Self-wounding- and Alchemy cards concise with them are needed to consistently develop passive value. S-W must set up the board first and then Alchemy triggers the extra heal value. Otkell is a unique unit, which wounds self and plays two alchemy cards in the same turn – running Otkell, BT gets extra effective points (~12p ceiling for full heal in all-in Alchemy deck; +2 guaranteed instantly). Derran played into
- Incidental Damage Meta * | Battle Trance passive ability naturally gets heal targets when opposing cards wound units. It would often happen in the case of random (Dwarf Berserker, Onager…) or dispersed (Brokvar Warrior, Svalblod) damage.
Concluding from the presented synergies, Battle Trance is a leader ability to host Alchemy and greedy Sigvald abuse decks.
Demo decks:
- Battle Trance Alchemy Portal – Battle Trance value here comes from Crow Clan Preacher synergy and Otkell healing. This version runs Portal in order to guarantee enough Freya’s Blessing targets.
- Battle Trance Sigvald Abuse – Battle Trance could be used for greedy Sigvald play. Artis is added for threat overload and may be protected with the leader.
Rage Of The Sea
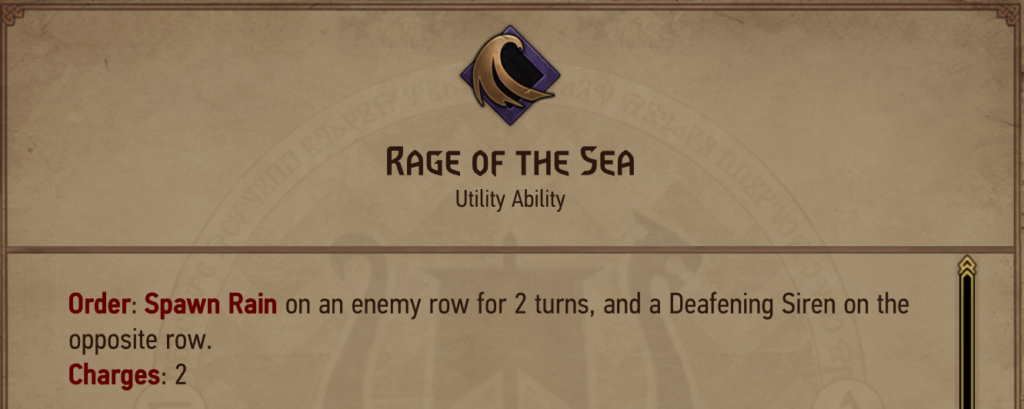
Rage Of The Sea is a pointslam leader ability worth 12 raw points: 4(Sirens) + 8(Rain). The Rain part is conditional; may be troublesome in short rounds or against armored / no-unit opponents. Otherwise, Rage Of The Sea is the higher raw points leader ability in Skellige.
- Rain Payoff Cards *** | Rage of the Sea may (but doesn’t have to) make use of cards with Rain Synergy. Messenger of the Sea is the most distinctive of these – a bronze engine with huge ceiling, growing by 2 with a single row rain, by 4 if rain hits at least a pair of targets in both rows, and even more when Storm is ongoing in a row with 3 units or more. MotS ceiling is at win-condition level for a very low cost, but this card doesn’t help to solve RotS problems in matchups which are hard by itself (armored/no-unit builds).
- Anglerfish Thinning *** | Rage Of The Sea makes thinning with Anglerfishes more consistent.
- Poinslam Balance ** | RotS is a pointslam leader ability and should be accompanied with some control. High-end poinstlam core is also important, because RotS struggles in a short round when bled dry; it is better to even commit the leader early in Round 2 to just preserve a strong short round card (for example Corrupted Flaminica).
- Locks ** | Control in the form of locks fits RotS especially well, because bodies left on the board are useful to get full rain value.
Demo Decks:
- Rage Of The Sea Classical Rain – Old way of playing Rage of the Sea; in a long round Melusine orders + Rioghan along with Messengers of the Sea could generate a massive finisher swing. Rain stacked on the board also enables Bride of the Sea into Sigrdifa’s Rite.
- Rage Of The Sea Beasts Nekker – ‘Anglerfish Thinning’, ‘Pointslam Balance’ realized by Corrupted Flaminica high-end pointslam core and ‘Locks’. Similar deck used to be very strong when Magic Compass was 9 provision and playable with Golden Nekker. Then due to efficient thinning it was possible to switch between 1x and 2x Compass with Delirium in a proper build.
- Rage Of The Sea Compass Beasts Midrange – Rain and its payoff is of secondary importance in this deck which focuses on securing the last say for Corrupted Flaminica and has resources to deal with different threats.
Patricidal Fury
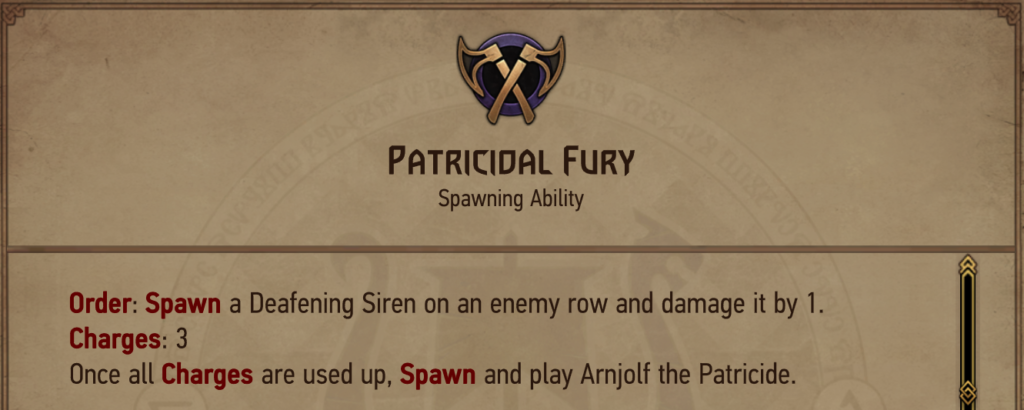
Patricidal Fury is a mix of pointslam and synergistic leader ability (9 raw points on all charges; 11 on the last if the rest was used earlier). Patricidal Fury main synergy is enabling bloodthirst effect, which could be done conveniently even in a short round with this leader. If PF is combined with area damage card, like Svalblod, leader effective value is straight ~13 points, which is already on par with pointslam focused leaders.
- Bloodthirst *** | Patricidal Fury enables bloodthirst effects (up to Bloodthirst:4) independently on the board state. In the turn leader ability is used, Bloodthirst could be statistied with no possible counterplay from the opponent. For example after full leader use Sove may summon 4 power target and destroy it in one turn.
- Area Damage *** | If a deck plays area damage cards (Svaldblod, Offering to the Sea, Wild Boar of the Sea…), then the effective value of spawned tokens is zero.
- Bloodthirst Scaling *** | The power of some cards scales linearly with the number of wounded units on the board: Brokvar Archer, Bear Witcher Mentor, Giant Boar, Madman Lugos and Arnaghad.
- Board Clog ** | Deafening Sirens spawned by Patricidal Fury could interfere with the placement of the opponent’s units. Especially swarming and row-locked decks may suffer from the lack of space due to additional 4 tokens.
- Body ** | Arnjolf The Patricide is 13 power body, having synergy with Triss: Meteor Shower and Renfri (Curse of Gluttony)
- Deathblow setup ** | 1 power Deafening Sirens are perfect targets for close to ground Deathblow cards. Especially Sihil is most conveniently set up with PF.
- Regis * | 1 power Siren helps to set up a Regis row.
Patricidal Fury is very rich mechanically, supporting various archetypes and ideas.
Demo Decks:
- Patricidal Fury Svalblod Sove – Svalblod represents ‘Area Damage’, Sove and Armored Drakkar ‘Bloodthirst’ are set up with the leader ability.
- Patricidal Fury Mentors Nekker – ‘Bloodthirst Scaling’. Golden Nekker makes it more convenient to run a strategy of mass wound for which bronze cards – Bear Witcher Mentors – are the main payoff.
- Patricidal Fury Greatswords Meteors – ‘Body’. Arnjolf is accompanied by high base power units: Greatswords and Sove to prepare massive Triss: Meteor Shower.
- Patricidal Fury Sihil Raids – ‘Deathblow setup’. Patricidal Fury used in the preceding turn sets up the board for Sihil deathblow. Often the whole leader ability is committed instantly to prevent any playarounds. Sihil decks play mostly bronze cards in the deciding round – these have to be as strong as possible. Finally 3 power Masterful Sihil is left in hand – in this deck Tyr comes handy to shuffle Sihil back and replace it with ~16 power bronze unit. Feel free to add Arcane Tome for more consistency.
- Patricidal Fury Regis – ‘Board Clog’ (PF + Feral Bonds + Triss:Telekinesis into Feral Bond + Villem + Gerd) forces the opponent to build a stacked row for ‘Regis’. Svalblod finisher (‘Area Damage’) retrieves Skellige Wolves.
Ursine Ritual
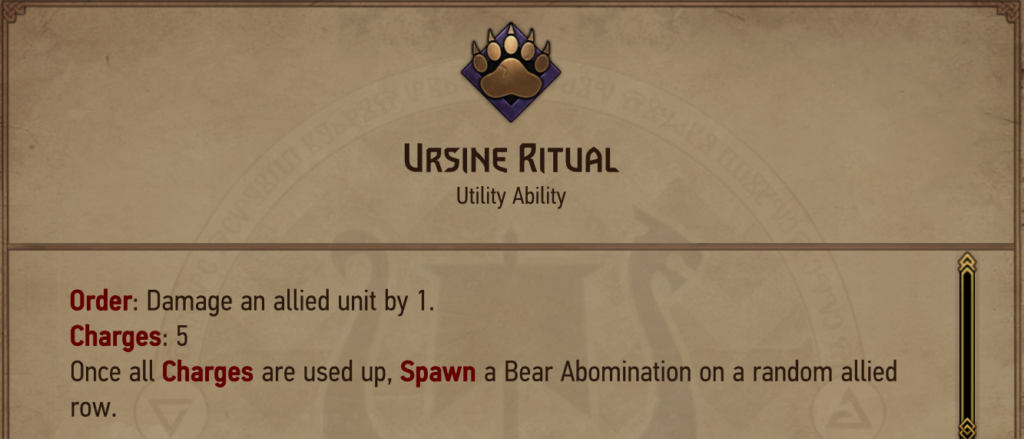
Ursine Ritual is a highly synergistic leader ability worth net 1 point (6 power Abomination – 5x self ping). In order to be playable, Ursine Ritual has to transform self-damage to positive points at least in 1:1 ratio (~11 points total). To be really good, the effective value must be even higher, about 1:2.
- Berserk *** | Ursine Ritual self-damage pings could conveniently activate Berserk units like Knut The Callous, Vildkaarl or Drummond Queensguard. Also Drummond Shieldmaiden could be triggered with just a single US ping.
- Self-Damage-To-Value-Units *** | Some units transfer each self-damage ping into positive value. Sigvald, Dracoturtle, Blueboy Lugos or Heymaey Protector are examples of such cards.
- Svalblod *** | Ursine Ritual has huge synergy with Svalblod. Not only self-damage pings could be used to transform Svalblod Fanatics, but also Bear Abomination spawned when US instantly triggers Svalblod’s area damage. It is especially important when Svalblod is summoned from the graveyard with Sigrdrifa’s Rite.
- Cerys: Fearless ** | Cerys: Fearless is most convenient in Ursine Ritual decks where the leader ability helps to summon her at the correct time.
- Restore ** | Damaging your own unit could improve the value of Restore – a cheap Alchemy card. Each extra damage transfers to 2 points on Restore.
- Self-kill * | Ursine Ritual could be used to incidentally kill units unwanted on our board (for example False Ciri), or as a part of own strategy – to prepare graveyard for cards like Fucuysa or Sigrdifa’s Rite.
Demo Decks:
- Ursine Ritual Self-Wound Portal Dracoturtle – ‘Berserk’, ‘S-D-T-V’, ‘Svalblod’. This version is greedy with respect to consistency. Self-wound cards tend to work very well together. Having more self-damage targets (Dracoturtle, Vildkaarl) than just a lonely Sigvald it is easier to play around the tall punish and get decent value from each card.
- Ursine Ritual Melusine Self-Wound – More Classical version of Self-Wound, which includes Melusine, Restore and Cerys:Fearless.
- Ursine Ritual Cerys Constructs – Ursine Ritual is used as a double trigger for Shieldmaiden spawned by Cerys. Three leader charges here are pure waste to be used when irrelevant (swap one of the tutors for Vildkaarl to avoid it). Deck is prone to bricks and very reliant on finding cards early. Constructs and Cerys are supposed to be committed in Round 1 and retrieved with Lippy.
Blaze Of Glory
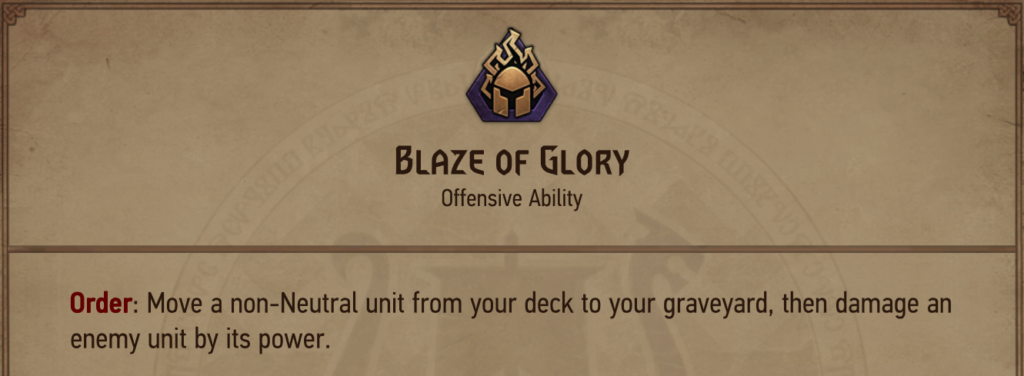
Blaze of Glory is a leader ability with value dependent on opposing deck. The raw value could reach up to ~13 points on a tall unit (Jutta an Dimun in Gwent 11.11), while effective value of threat removal may be even higher.
- High Power Threats Removal *** | Blaze of Glory reaches its highest effective value when removing tall threats (Keltullis, Bincy Blumerholdt…). The more of such units are present in the meta, the more useful BoG is.
- Eist/Svanrige *** | Blaze of Glory could activate Eist Turiseach in a Devotion deck or Svanrige Turiseach right in the turn they are played.
- Extra Thinning ** | Blaze of Glory thins the deck, which may be especially important in the context of Magic Compass.
- Pointslam Balance * | Blaze of Glory decks would usually run strong pointslam core to compensate for the unstable value of the control leader.
- Graveyard Setup * | Unit set up on graveyard may be useful for other cards; for example Hjalmar may use An Craite Greatsword.
Demo decks:
- Blaze Of Glory Eist Warriors – Eist is coupled with the leader ability and has formidable ceiling of ~30 points when Greatsword is summoned from the deck and hand at Bloodthirst:3 (Gwent 11.11)
- Blaze Of Glory Svanrige Warriors – Svanrige coupled with An Craite Greatsword is more flexible than high-end Eist and more efficient unless both Eist effects get triggered.
- Blaze Of Glory Renfri Beasts– Leader ability provides control which is otherwise lacking in a pointslam oriented Renfri Beasts deck (‘Pointslam Balance’), but also brings one very useful thinning (‘Extra Thinning’). Finally, putting extra beast on graveyard adds +2 value to Corrupted Flaminica finisher.
Summary
- The keyword for Skellige leader abilities would be Damage. Onslaught, Reckless Flurry and Blaze Of Glory use damage for removal, but even solitaire leader abilities like Battle Trance have a damage element.
- Onslaught and Battle Trance leader abilities are justified only in their archetypes (Pirates/Alchemy(or greedy Sigvald)), while the rest of Skellige have more deckbuilding freedom. Especially Patricidal Fury stands out as a host for various archetypes.
Closure
Hope you enjoyed this overview of Skellige leader abilities and maybe would like to try some of presented decks/ideas yourself. Feedback is very welcomed; if you know about other decks/ideas making use of SK leader abilities, please let me know – I may update this article accordingly. Also if you tried any of demo lists from this or preceeding articles, feel free to share your thoughts and maybe spicy pics. Next chapter would be the final one, devoted to the last faction: Syndicate.
All decks from the series could also be found in a Google Sheet.