
Introduction
After General Guide To Leader Abilities In Gwent, we have moved into more detailed breakdown, faction-by-faction, following the alphabetical order:
- Monsters Leader Abilities In Gwent – Strategy & Decks
- Nilfgaard Leader Abilities In Gwent – Strategy & Decks
This time we visit Northern Realms. Each leader ability would be accompanied by a short characteristics, the most important synergies (importance rated with stars) and example decks.
All demo decks presented in the series could also be found in a Google Sheet.
Inspired Zeal
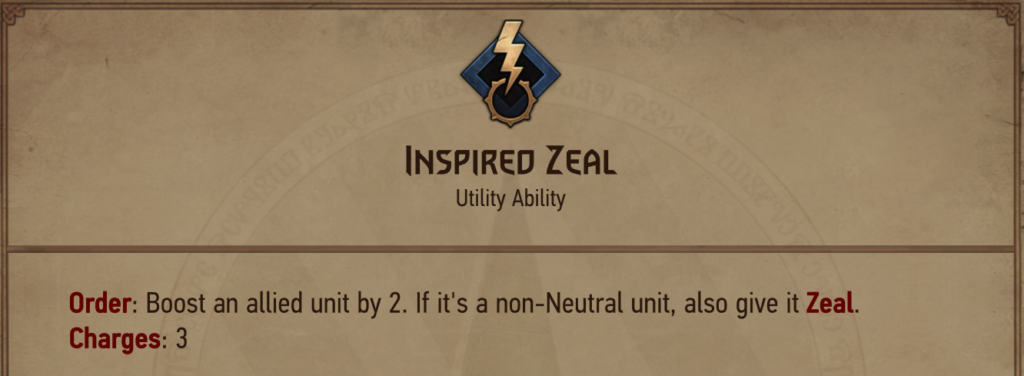
Inspired Zeal is a synergistic leader ability (6 raw points). The synergy value is developed by Zealing Nothern Realms units. With 3 base leader charges the extra value would come from a limited number of them. How much IZ builds are concise would depend on Zealed cards and their synergies; leader itself is neutral for the rest of the deck. IZ is as good as much above the power vs provision curve best leader targets play in a given deck (6+sum of value above the curve).
- Strong Order Effects Without Zeal *** | Such cards exist amongst both golds (Raffard’s Vengeance) and bronzes (Reaver Scout). Further synergy discussion would just enumerate some of such cards, which often define the archetype of IZ deck. Good value of Zealed cards is usually also the win condition, because they are supposed to play 3 or more points above Power vs Provision curve.
- Duelers *** | Dueling cards directly benefit not only from Zeal, but also +2 buff part of IZ. Seltkirk, Anseis and Loredo are NR duelers. 5 power Seltkirk with IZ charge could instantly kill a unit up to 11 power (in such a case Seltkirk ends as 2 power and plays for 13 points). Duelers are efficient control tools, roughly playing on the curve in raw points. A unique perk of Dueler cards is the possibility of playing for more value/tall punish when buffed. To prepare value Dueler it is possible for example to hoard Order boost card (like Kerack Marine / Ildiko) or use stratagem spawned with Radeyah. Of course, value Dueler would bring extra points only when proper targets are present in meta.
- King Demavend *** | Tutor and a value card at the same time. Compared with Royal Decree, Demavend instantly plays for 7 points more and is universal. In addition to this, Demavend threats to play 2 more cards if not countered, which likely would be worth about ~15 points and could be used in various 2-per-turn combos. Undisturbed Demavend value is ~35 points for 13 provision (Gwent 11.11). King Demavend with Inspired Zeal is on par with meta high-end cards and as a rule of thumb every extra use could be directly added to IZ value. To maximize such a chance, KD goes best in engine overload decks. KD is also a thinning tool when played in R1/R2 and possibly reaches the most direct value in such a case, because best tutor targets are likely still in the deck. At the same time, KD is a huge commitment; a huge payoff from round control is needed in return.
- Raffard’s Vengeance *** | Raffard’s value is drawn card(s) + crew ability. Instant value (Gwent 11.11) is roughly 5+7(top deck value) + 1 (because sometimes Crew is instantly triggered and sometimes not) => 13 for 10. When undisturbed, RV ceiling in later turns is roughly 9*2(crew trigger, assuming row doesn’t get filled)+2*7 = 32. Added to the instant value we get ~44 for 10. Just like KD, Raffard has a formidable ceiling and works best in engine overload decks.
- Reaver Scout *** | Reaver Scout brings 2 points + an extra copy of a unit. Unless given unit scales with the number of copies, the IZ payoff is max 2 points – underwheImprisonment Nekker Cloggers lming. The story becomes different when Reaver Scout synergies come into play. Reaver Scout + Flotsam is basically extra card carryover and great source of engine overload. Casting Contest on RS is equivalent to 5 points. If copies are scaling (Cintrian Royal Guards), or are just powerful engines (Reaver Hunters), the impact of RS is also higher.
- Blue Stripes Commando *** | Inspired Zeal triggers BSC, which may lead to Blue Stripes Swarm archetype with Princess Pavetta played for carryover.
- …
Inspired Zeal is a leader ability in 100% reliant on the quality of a narrow group of target cards. Engine Overload with cards like King Demavend, Raffard’s Vengeance or Reavers Scout is the most common motif. Duelers could be a useful control addition to any deck and Blue Stripes Commandos are a unique, concise archetype.
Demo decks:
- Inspired Zeal Order Overload – Powerful Zealed threats: Demavend and Vengeance are combined with engine overload. Best version will depend on the current balance state. Sometimes the same idea would be best realised in a Golden Nekker Overload deck, where Vengeance/Demavend are replaced with 9 provision Seltkirk as the Zeal payoff card.
- Inspired Zeal Alumni – Inspired Zeal supports mainly Raffard’s Vengeance, which is a very strong value/overload card in this archetype running many Mages. In addition to this, Demavend is included as a superior tutor, threat and a Winch target. Outside these two cards, Inspired Zeal is useful on Alumni spawned with Chapter of Wizards or when 4 patience threshold isn’t satisfied. Consider cutting Keira Metz if the meta is too control heavy.
- Inspired Zeal Drunken Duelers – not a strong option in Gwent 11.11, because NR engines are trading well with control, but an example of how pointslam approach to Duelers may look like. Here Ale of Ancestors and Mushy Truffle is combined with Seltlkirk and Anseis to get high value duels.
- Inspired Zeal Blue Stripes – In this version Reavers Scouts are used on Blue Stripes Scout to copy Commado. In Gwent 11.11 a row full of 4 power Blue Stripes is not outstanding in power compared with two high end golds, especially taking into account that Pavetta is played in the same round – deck lacks teeth even when everything goes well.
- Inspired Zeal Ship Ballista Dijkstra (playable meme) – very few units different than 5c are played in order to get 2 or 3 unbuffed units in deck. Then hitting Sigismund is guaranteed (or just very likely if something goes wrong). Erland gathers all buffs and protects them with Immune.
Royal Inspiration
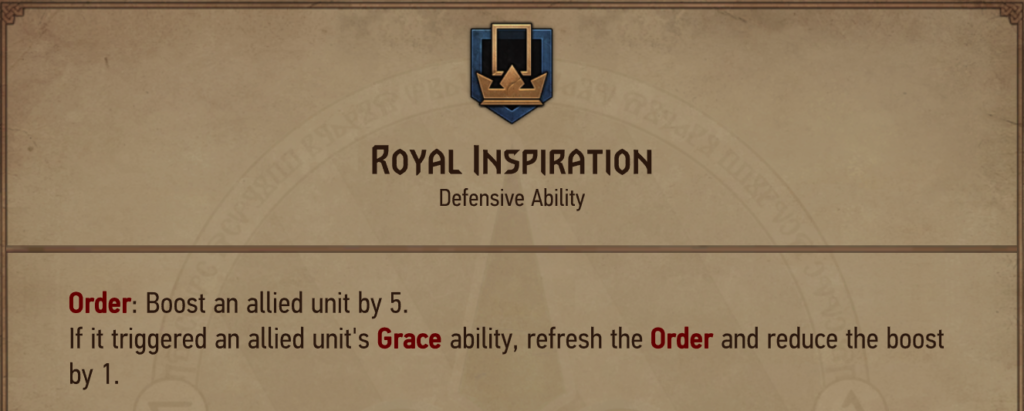
Royal Inspiration is a leader ability requiring at least 3 Grace units on everygame basis to play for an acceptable value (~12p; only 5 points without Grace triggers). The raw points ceiling is equal to 15 points – very high pointslam value. If compared with a typical pointslam leader Blood Scent (Monsters leaders), the ceiling is better and buffs may help to protect engines, but the drawback is going tall.
- Knights *** | If we look into Grace units available in Northern Realms, all of them are Knights. Amongst them, there is only one high-end possibility of combining leader ability with a win condition strategy: Damsel in Distress + The Maiden’s Shield. Three other golden Knights are not win-condition cards.
- Grace Payoff ** | Royal Inspiration helps to trigger Grace effect and the question is if its enough to make targets play above power vs provision curve. Let’s take The Maiden’s Shield (4 base power in Gwent 11.11) as an example. To trigger TMS instantly, for example Squire infuse + 2x leader charge may be used. TMS plays as 9 for 9 instant and goes very tall. The only possible payoff is Bronwen The Bold infusion effect. In Gwent 11.11 the standalone payoff from Grace compared with meta cards is rather small or convoluted, because triggering it is already rewarded by Damsel in Distress 1st Chapter.
As we could see, Royal Inspiration is a leader ability dedicated to one particular archetype: Knights. Moreover, this archetype relies on one powerful, dedicated high-end card: Damsel in Distress.
Demo decks:
- Royal Inspiration Knights Classic – Royal Inspiration is combined with Damsel in Distress to trigger Grace with +4 neighbour boost payoff; first charge is sometimes used earlier when endangered in Round 1; for example to trigger Knight Errant to get +4 boost on Immortals in Damned Sorceress combo.
- Royal Inspiration Knights Regis – Regis + Necromancy combo fits well in Knights archetype, where tutoring is rich and many tall punish targets are present naturally.
Mobilization
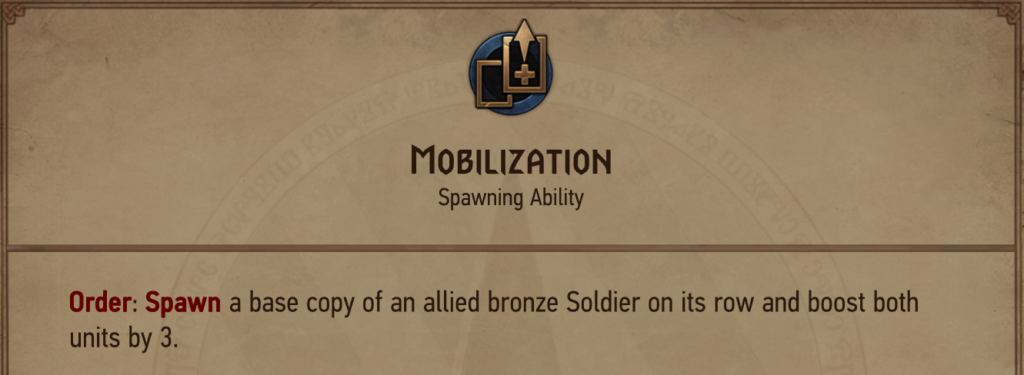
Mobilization is a leader ability whose character depends on the copied soldier type. The value is 6 + copied bronze. The most plausible, high ceiling direction is engine overload; for example Mobilitzation used on Reaver Hunters has direct ceiling of 6 + 21 (new copy ceiling) + 2 (instant pings from both copies thanks to immediate leader use) = 29 points. An example pointslam target: Kerack Marine is 6+7 = 13 (Gwent 11.11). While underwhelming compared with Reaver Hunters or other engines potential, such value is still not very bad in comparison with pointslam leaders (Blood Scent, Tactical Decision).
- Engine Overload / Double Threat *** | If the opponent is unable to answer two threats at the same time, Mobilization could reach formidable value (Reaver Hunters example shown in the intro). In order to not lose overload effect, fresh threats / engines have to be consistently developed on the board, at least up to ~3 last turns.
- Engine Scaling *** | If going for engine overload, in order to make the most out of extra copy, as good long round scaling as possible is needed. Following cards have good scaling potential:
- Reaver Hunters: +2
- Reaver Scout: = target scaling
- Cintrian Royal Guard = extra copy is equivalent to +3 per turn scaling in a hand full of CRG copies
- Lyrian Arbalest: >1 in an all-in order deck + directed removal value
- Kaedweni Revenant: <5 (depends heavily on setup; Gwent 11.11)
- Scaling Agent *** | Sometimes other cards help to elevate engine scaling, for example:
- Idarran – especially strong with self-spawning engines, like Reavers Hunters or Revenants. In such a case, Idarran may be instantly triggered, which establishes another double threat.
- Ravanen Kimbolt – summons another engine from the deck if board is set up well and threatens another spawn each turn thanks to Orders present on the board.
- Host Payoff ** | Mobilization helps to guarantee a unit on the board, which may be a host for a strong payoff card (Scaling Agents or for example Casting Contest on Reaver Scout).
Mobilization is a proactive and impactful leader ability. In Gwent 11.11 it supports engine overload with a floor of about 10 points and ceiling above 20 whenever overload succeeds.
Demo decks:
- Mobilization Reaver Hunters – Mobilization is used in Reaver Hunters engine overload. It is the cornerstone of the deck; Mobilization spawns a copy of Reaver Hunters and boosts the pair by 3, which makes it very hard to deal with both at the same time. Getting one Reaver Hunter active on the board is the bottleneck of the deck (otherwise Idarran becomes a wholesome 6 for 8 Elder Bear) and consequently Mobilization is worth more than 20 effective points in this build; committing leader ability should be avoided as much as possible.
- Mobilization Kaedweni Revenants – Mobilization combined with Kaedweni Revenants (at 4 power in Gwent 11.11) may lead to a unique archetype. Ronvid provides 1 power feed for self-swarming Revenants and Idarrran is a convenient scaling agent. Deck works best in mid length rounds, where the swarm just fills the board and payoff cards have time to develop.
- Mobilization Golden Nekker Overload – Mobilization has many targets available to use: Reaver Hunters, Scouts or even Arbalest, depending on what sticks. Golden Nekker is a stronger standalone support for engine overload decks than any other gold card in Nothern Realms. A similar deck, but under Inspired Zeal was played by Mya-Mon369EX in Gwent Masters 5 Finals.

Shieldwall
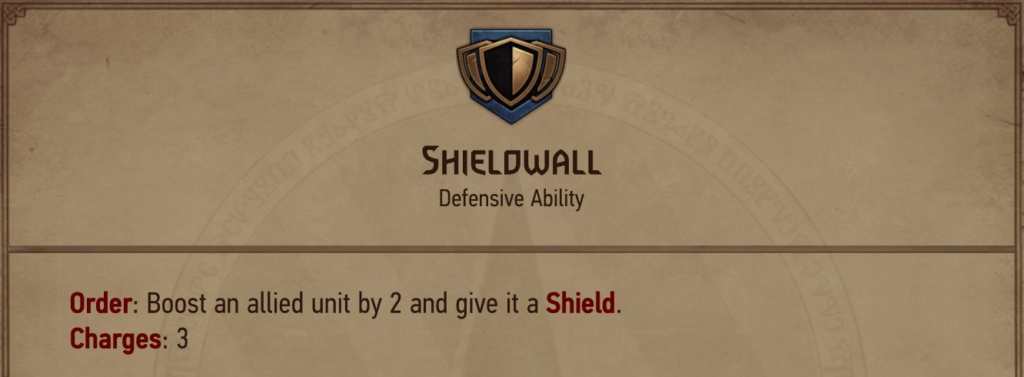
A synergistic leader ability (only 6 raw points), supporting mainly greedy engines (then effective value depends on control tools used in meta) and Shields archetype in Northern Realms (pure value on King Roegner).
- Greedy Threats Protection *** | While Mobilization supports bronze overload, usually providing at least 10 points at the start, Shieldwall is designated to protect golds cards which standalone could provide impact as big as double bronze engine; weak/mediocre threats are not justified. Example gold NR targets: Ravanen Kimbolt, Keira Metz, King Foltest, Keldar, Dandelion, Belohun, Vysogota of Corvo, Black Rayla, Leticia Charbonneau… Some bronzes with high ceiling and impact in particular archetypes are also good targets: Ban Ard / Aretuza Students in Alumni, Meditating Mages in MM Spam.
- Shields Archetype *** | Shield archetype in Gwentfinity is defined by one payoff card: King Roegner, who is convenient only in a deck capable of securing last say. Roegner scales +3 with each shield on the board. In Gwent 11.11 King Roegner is 4p/8c, which means that 3 shields are needed for Roegner to break even with respect to meta (provided that the rest of the cards play on the curve alone rather than just feeding Roegner). If enough body is on the board, the leader may play as 3(charges)*5(buff+Roegner) = 15 or with two extra Radovid even 5*5 = 25 points. The drawback is being tied strictly to Roegner; which is troublesome when defending the bleed.
- Value Duels * | Shielded Duelers could provide huge value against tall units. Anseis + Shieldwall charge could instantly remove a unit up to 15 power.
Shieldwall power very depends on the supported deck and meta; the leader ability itself is very low raw points and cards and their synergies have to make up for this weakness.
Demo Decks:
- Shieldwall Shields Nekker – Shieldwall in this deck helps to protect greedy enough engines (Dandelion, Keldar…) and also supports King Roegner value. Dandelion boosts could be used to help Knight Errants break Grace threshold (potentially +10 on Roegner).
- Shieldwall Alumni – Shieldwall helps to protect vulnerable Students in Round 1 and greedy Keira Metz in Round 3. This approach has way less pointslam than classical Inspired Zeal Alumnis, but showcases very well engine protection capabilities of Shieldwall.
- Shieldwall Meditating Mages – Shieldwall is used for engine protection on Idarran and Meditating Mages, who are obviously the win condition of the deck. Effective value of a single Meditating Mage saved from removal could often amount to ~20 points taking into account the payoff on Aretuza Adepts. For more consistency, similar deck could also be run under Pincer Maneuver leader.
- Shieldwall Double Ciri Renfri – When used as an engine protection tool, the earlier Shieldwall is spent, the higher effective value is. It is tempting then to build a deck where the leader is committed early and protection value is transformed into carryover. Renfri goes well with such a strategy and Renfri Shieldwall decks are an interesting field for experiment in general – 2x Ciri is surely not the most competitive option.
- Shieldwall Constructs Roegner – This deck demonstrates Shieldwall with Radovid carryover as a value finisher combo with King Roegner; Constructs package is included to provide some control when duel cards couldn’t be used without charge commitment.
Stockpile
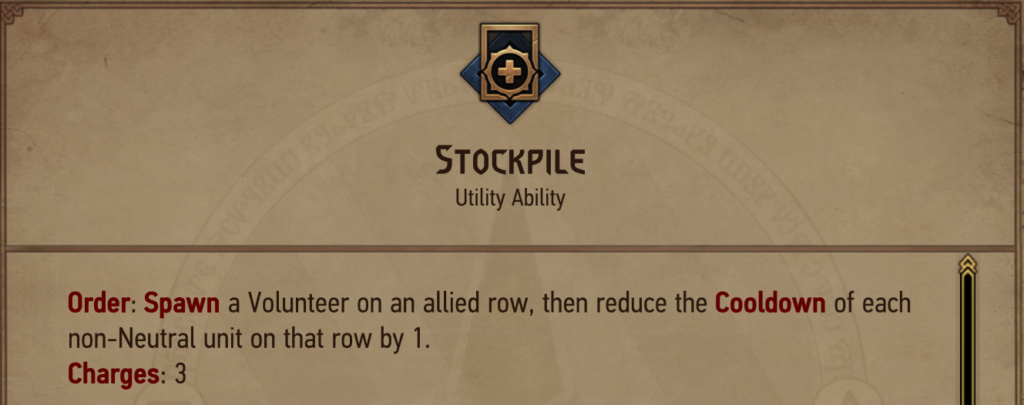
Stockpile is a synergistic leader ability, whose power scales with the number of cooldown cards set up in a row. The raw value of Stockpile is only 6 points, which means that effective value developed from synergistic cards must be at least higher than ~6 points in order for Stockpile to be competitive.
- Cooldown Overload *** | Stockpile may develop extra value from Northern Realms cooldown cards. The payoff from each leader charge differs between units, for example:
- +½ deckbuff on Redanian Agent
- +1 boost on crewed Siege Tower
- 1 damage on Reinforced Ballista
- 2p volunteer spawn on crewed Kerack Frigate
- 2 damage on Foltest’s Pride having perfect targets
- 2 boost on Henselt neighbouring two cooldown cards
- Pointslamization *** | Stockpile doesn’t offer good pointslam value itself, which is a serious weakness especially when the round gets shorter. The main possible remedy is coupling Stockpile with whatever develops the most value in one turn. For full convenience, we need a Zeal + Cooldown card. It soon appears that Henselt + Foltest’s Pride (both with +2 points per charge potential) is by far the best option. The initial combo value is only 3+5+4 = 12 for 17c ceiling, but gives at least ~+2 to each used leader charge in the suboptimal scenario and +4 in the best scenario (Foltest in crew pocket, even number of charges, Henselt neighbored by another Cooldown engine, full 4 damage value from each FP shot). For an even number of 4 charges after Radovid use, we get between 20 and 28 effective points. Pointslamization is also supported by Radovid Judgement, who at expense of 6 excess provision cost adds guaranteed value to the round where the last leader charge is used.
- Machines *** | Further inspection of the cardbase in the context of synergies above show that Stockpile supports mostly Northern Realms Machines archetype. With Henselt and Resupply units being played, Warfare cards get extra value. Also Onager could be a great payoff engine; each leader charge used on Reinforced Ballista for example grants 2 Onager pings.
- Radovid ** | As shown above, in a good Stockpile build each leader charge is worth at least 4 points, but on a well developed board easily even more than 8. Therefore extra charges brought by Radovid give exceptional carryover and this card is almost autoinclude in every Stockpile deck (Gwent 11.11).
- Cooldown Overload *** | Stockpile may develop extra value from Northern Realms cooldown cards. The payoff from each leader charge differs between units, for example:
Stockpile in Gwentfinity due to limited number of NR cooldown cards supports mostly one archetype: Machines. Thematic leader ability, testing row management and initiative, just like real life siege does.
Demo Decks:
Stockpile Siege Devotion – demonstrates all the points raised in the ‘Synergies’ list: big number of cooldown cards, strong pointslamization with Radovid: Judgement and Henselt + Foltest’s Pride played in a short round if needed. Normal Radovid brings lots of effective carryover and the whole deck is built on the Machines archetype. Onagers get outstanding value with leader ability whenever at least one low cooldown unit sticks.
Pincer Maneuver
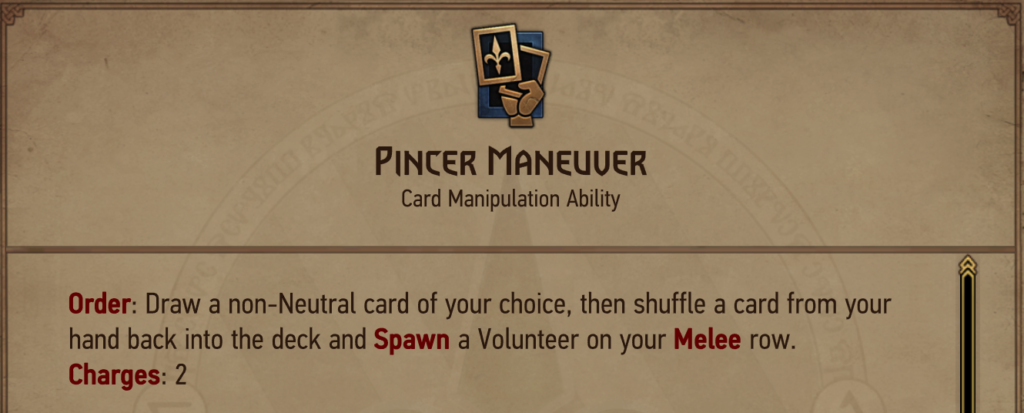
Pincer Maneuver is a consistency and synergistic leader ability worth only 4 raw points. In order to develop competitive value, Pincer Maneuver has to make use of dedicated cards which benefit from shuffling (Travelling Priestess, Melitele) or support very strong gameplans where consistency is crucial. In Gwent the odds to find a single card in R3 is 80% (~+2% more for first cards thinned); with a single tutor it is more than 97%. Pincer Maneuver then is a very weak leader ability if played only for consistency in R3 in a normal deck (compare for example with points provided by Mobilization).
- Shuffle Value *** | Melitele and Travelling Priestess are archetype-defining cards whose value is developed when shuffled back into the deck. Minor cards which benefit from shuffles are Snowdrop and Istredd; both of these cards also could bring more shuffles themselves and are regularly run in Melitele/Travelling Priestess decks (Gwent 11.11). Let’s look into win-con targets below.
- Travelling Priestess *** | TP gets +2 charges from each PM leader charge. Then this +2 could be further multiplied in combo with cards like Onager or Tridam Infantry. In practice +4 may be guaranteed with Vernon Roche playing Priestess and multiplier in one turn. TP provide seldom in Northern Realms pointslam core for a short round, which often enables winning it a card down.
- Melitele *** | Pincer Maneuver supports Melitele not only by shuffles but also by providing volunteers body for area boost. While TP scales linearly, Melitele is a more greedy, non-linearly scaling shuffle payoff card. Meltiele ‘Maiden’ phase power scales with the number of units on the board and is the source of most points. Getting the +3 boost from Maiden phase requires 10 shuffles. Leader grants 2 shuffles, possibly 3 or 4 with Radovid. The rest has to be done by units and draws, which is variant. To maximize the number of shuffles Melitele decks try to quickly get as few units in the deck as possible.
- Linear Gameplan Consistency *** | PM helps to consistently realise gameplan based on Northern Realms cards, which starts from Round 1. Example cards to find in Round 1 are Mutagenerator and Temple Of Melitele first form. The gameplan would usually be carryover abuse or heavy abuse of round control (for example R2 push and winning short R3 at card disadvantage).
- Temple Of Melitele Spawns *** | extra golds spawned in the deck could be found with PM. The more legendary cards are valuable for the deck and the less are already run, the better average Temple of Melitele value is. Average effective PM value is even higher when Runemage improved the average picks.
Demo Decks:
- Pincer Maneuver Devotion Priestess – Radovid: Judgement in a Devotion deck is a thinning card with distinctive power (10 points); on the path of thinning down to 2 cards for Vernon Roche combo, this version of Priestesses spits out more points than any other. Siege makes it easier to gain round control (as played by Magpie in World Masters 5).
- Pincer Maneuver Renfri Priestess – With Renfri’s ‘Play a unit’ (Curse of Sloth) or ‘Play lowest cost unit’ (Blessing of Charity) abilities available, Travelling Priestess leader charges may get exceptional x3 multiplier in a single turn.
- Pincer Maneuver Melitele Tutors – This version concentrates on the maximal number of Melitele shuffles rather than swarming. Tutors like Amphibious Assault and Alzur’s Double Cross could be used early to provide thinning and proper sequencing, but also in R3 could be used to play payoff card from deck rather than hand.
- Pincer Manuever Melitele Demavend – Demavend thins on deploy 3 cards from the deck, often units (2x Siege Support, 1x Cintrian Envoy). This version runs Germain Piquant, who helps to make most out of Melitele: Maiden boost.
- Pincer Maneuver Erland Shupe – here ‘Linear Gameplan Consistency’ and ‘Temple of Melitele Spawns’ synergies of Pincer Maneuver bring value. PM is used to find Mutagenerator / Temple Of Melitele in Round 1 and later the cards spawned into the deck by Temple.
Uprising

Uprising is a pointslam leader leader ability which requires crowded enough row of boosted units to develop full Lyrian Scytheman value. The raw points ceiling is equal to 15, but the floor is only 7. The ceiling is ~3 points better than a normal pointslam leader, while the floor is very underwhelming: ~5 points worse. In the case of Uprising, cards are needed to develop good leader ability value rather than reverse.
- Swarm *** | 8 units in a row are necessary for full Uprising value. High-end pointslam core cards in an Uprising deck should provide multiple bodies (analogically to ‘Pointslamization’ in Stockpile section). An example of such a high-end core is WItcher Trio (Vesemir, Eskel, Lambert) + some carryover boosts.
- Dispersed Boosts *** | Units crowding the row have to be boosted. Most convenient for short round is when boost do not require playing a card. For example Witchers trio is boosted in the deck. Also Mushy Truffle location order may be very useful. On the other hand in the long rounds swarm payoff boosting tools, like Bone Talisman, Voymir or Queen Meve may shine.
- Leader Trade ** | To naturally play for full value, Uprising needs at least a mid-length round. The most point efficient strategy is often to trade the leader ability when going into a shorter round. Such an approach requires a strong pointslam core at the high end, which should maximise short round points even without any synergy with the leader ability.
- Inspired Activation * | Uprising can rather cheaply activate Inspired keyword, but compared with Shieldwall such activation is very unstable.
Demo decks:
- Uprising Drunken Meditating Mages – Meditating Mages resilience effect provides body for Uprising in the next round. Also Ale of Ancestors infusion is carried over. Along with Falibor, multiple boost threats become present on the board.
- Uprising Witchers Nekker – Iris: Companions and Vesemir: Mentor guarantee dispersed boosts, Witchers Trio provides swarmy pointslam core. Decree could often be used on Iris’ Companions, because otherwise topdecking this card with Golden Nekker may be troublesome. (sidenote: I wanted to include non-Nekker NR Witchers too, but building them in a convenient way is not easy; Griffin Rangers are conditional cards and Mentors are good only for hand fixing. Eskel: Pathfinder is one of the best cards to include, but then Iris and Lyrian Scythemens have to be omitted from the build…).

Summary
- Compared with Monsters and Nilfgaard, the distinctive feature of Northern Realms leader abilities is symbiosis with cards. Every NR leader ability has a dedicated group of synergistic cards, whose power determines if leader ability is playable or not. More power is located on supporting cards than in leader raw points.
- None of Northern Realms leader abilities is of control type, but Inspired Zeal combined with Duelers may provide extra instant control tools.
Closure
Hope you enjoyed this overview of Northern Realms leader abilities and maybe would like to try some of presented decks/ideas yourself. Feedback is very welcomed; if you know about other decks/ideas making use of NR leader abilities, please let me know – I may update this article accordingly. Also if you tried any of demo lists from this or preceeding articles, feel free to share your thoughts and maybe spicy pics. Next faction in order: Scoia’tael.
All decks from the series could also be found in a Google Sheet.