
Introduction
There were many deckbuilding articles in Gwent Pro Tutorial series, but none of them discussed what makes a good Gwent: The Witcher Card Game deck in the most general, philosophical way. If you haven’t read any of those yet, this guide would be a perfect introduction to articles like Into The Deckbuilding Rule Of 16 or How To Play Round 1 In Gwent
In this article we would derive 6 most important features of a good Gwent deck, then explore those features in more practical details. Finally we would see how the 6 is realized by meta decks from February Season 2024.
After finishing, I also recommend you to read ‘What makes a good deck?’ article by Puzzle.Express and note how well his practical advice goes along with this systematic lecture.
6 Key Aspects
- Points
- Pointslam
- Engines
- Setup + Payoff
- …
- Control
- Damage
- Tall Punish
- Wide Punish
- Lock
- Banish
- Graveyard Control
- …
- Evasion (efffective value removed from opponent’s cards by avoiding certain interactions)
- No-unit
- Not going tall
- Not going wide (for example vs Svalblod)
- Defender / purifier vs locks
- …
- Consistency
- Finding crucial cards at each stage of the game.
- Small proness to bad draws / bricks.
Categories above are universal for most card games. Points, Control, Evasion and Consistency are commonly present in the mainstream, mana-based, one-round card games. A special part in those is often played by the ‘Tempo’ aspect of Points; Aggro decks are popular in games like MtG or Hearthstone and have no real analogy in Gwent. The closest match would be aggressive Gwent decks (Bulldozer Strategy article) aiming at 2:0, but they have a different feeling. Due to the split into at least two rounds, the defender is in a better position than in mana based games. Imagine a Murloc Aggro HS player having to stop the assault and start again in the next round, while the opponent could hoard proper cards to defend in Round 2 and has one more turn to use.
Are there any extra categories worth deriving which are characteristic for Gwent? Yes.
5. Spreadability
Gwent is about winning 2 rounds out of 3. Consequently a good deck must be able to spread its power into at least two rounds. The packages winning both rounds must be internally concise. A deck which requires the same card to contest both rounds is badly constructed, very prone to aggressive push if only the opponent has the necessary information.
Contesting exactly two rounds is economically the most effective allocation of resources, but it limits the ability to actively interfere with the opponent’s plans. It is characteristic for decks with:
- low consistency / weak bronze package, which would pass R1 soon and invest power in R2/R3
- strong long round 3 gameplan with second say – deck invests power in R1/R3
- pure carryover focus (like Imagawa Machines), where R1 is sacrificed in order to develop max carryover. Such decks allocate power in R2/R3
Active decks are capable of contesting each round and adapt to the given matchup. A deck with perfectly spreadable power is able to invest just enough resources in each round to achieve necessary objectives. A weakly spreadable deck struggles to play more than one round and often is forced to overcommit.
6. Scaling
Ideally the deck is always able to force the beneficial round length. In reality, there is a competition with the opposing deck to reach the most favorable position. Especially in the ladder setting with random coin, getting optimal round length in every game is unreal.
The word ‘scaling’ is commonly used in a long round contest between two decks, where one of them outpoints (‘outscales’) opponent due to more points gained with round length. Here we would mean a broader definition, both ‘scaling up’ and ‘scaling down’. A deck which scales well is strong in short (4 cards) , mid-length (~7 cards) and long round (~10 cards). A deck scaling badly is strong only in long / short rounds.
Exploring The Deckbuilding Keys
Points
Points is the first and most important quality. Even if we manage to perfectly Control and Evade, at the end of the day we have to have more points on the board.
If we imagine something like average point output of meta decks, then only a deck with potential to equal or exceed such output is competitive. Translating this into cards level – only a deck where crucial cards play on or above power vs provision curve are competitive.
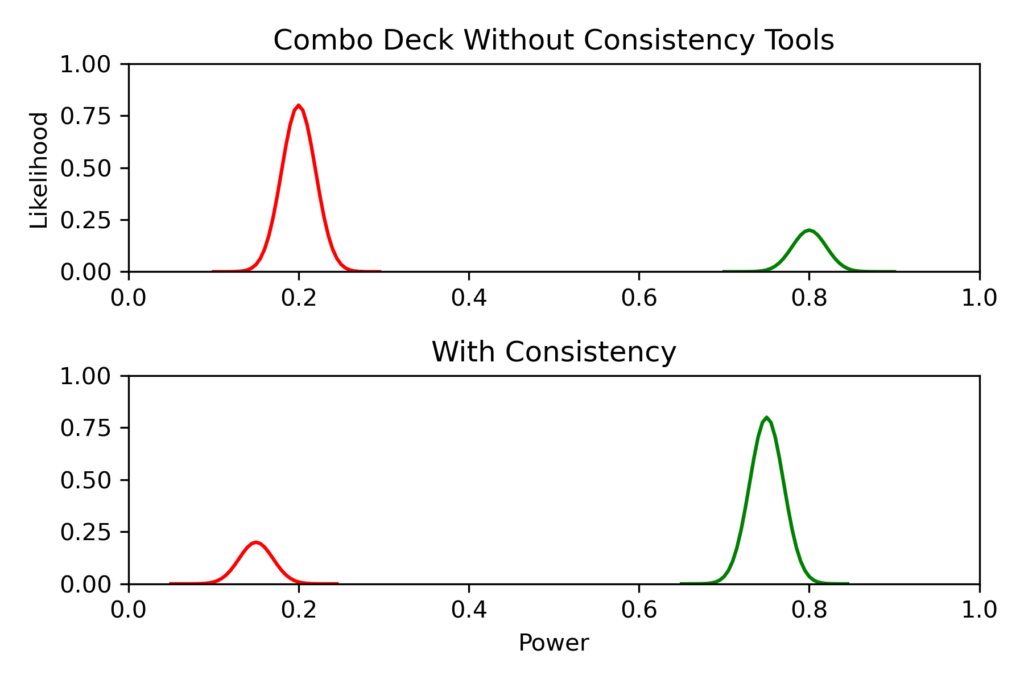
A greedy combo deck which has 10% chance to outpoint a meta deck is better than a consistent deck where every card plays slightly below the power vs provision curve in every game. Such a deck has no win condition.
Win condition is a scenario in which deck A outpoints deck B. Finding win condition is the cornerstone of successful deckbuilding. If we cannot visualise a win, we are doomed to lose.
Control
One of the common misconceptions is that control could win games. Such a view is not beneficial in Gwent. Control should rather be viewed as a toolbox offered by the deck to limit the opponent’s point output (deal with main threats / sources of points), while the game is always won by Points.
When a control tool counters opponent’s card and outputs more points than such a card, we trade up in points with the threat. Control tools which trade up are often a good inclusion.
Control tools trading down should be used with caution – sometimes they are necessary to limit opponent’s greed, but then in order to win, other cards have to make up the points.
Without Control, every game of Gwent is won by the greedier deck. Control is a measure of deck ability to mess up the opponent’s gameplan.
Evasion
Evasion comes after Points and Control. Just like Control, the usefulness of Evasion depends on matchups.
Evasion could be spontaneous and came from characteristics of the used archetype – for example Classical Swarm would naturally avoid tall punish. In such cases no adjustments are needed in the deck and no Points are lost. Forgotten archetypes may spontaneously become a good pick when evading the strategies of main meta decks.
A deck may be tuned to improve evasion, which always would come with Points tradeoff. For example an engine deck may include a Defender to evade locks, but Defender itself provides little Points value. Suddenly the deck may start to get outpointed by builds running no locks!
Many Evasion ideas are collective. In order to evade tall punish, none of the important units could go tall. To avoid wide punish none could go wide. To avoid damage as many plays as possible must be uninteractive.
It is possible to build decks all concentrated on Evasion, but its value must be really huge to make up for Points deficit. Back in the days of early Homecoming, no-unit decks (there was no limit of no. of units at first) or Immune Slyzard (there was Eredin Breacc Glas leader who used to give Immune – now Carapace) were the case. In Gwentfinity, the opportunities for Evasion focused decks are weaker, also because proactive points output is much higher.
Not every good deck must excel at Evasion, but every should be decent at it. Deck with amazing point output is weak when all points are located at one tall, vulnerable unit.
Consistency
Consistency is a support feature for Points, Control and Evasion. It lets deck potential to be realized more often in practice. Without distinctive Points and acceptable Control/Evasion, a high consistency deck would only be consistent at being bad.
The chances to find a single card in a game of Gwent with no thinning are ~80% for R3, but ~50% in R1. A single tutor elevates these probabilities to ~97%/~75%. For more details check out articles from GM&P series:
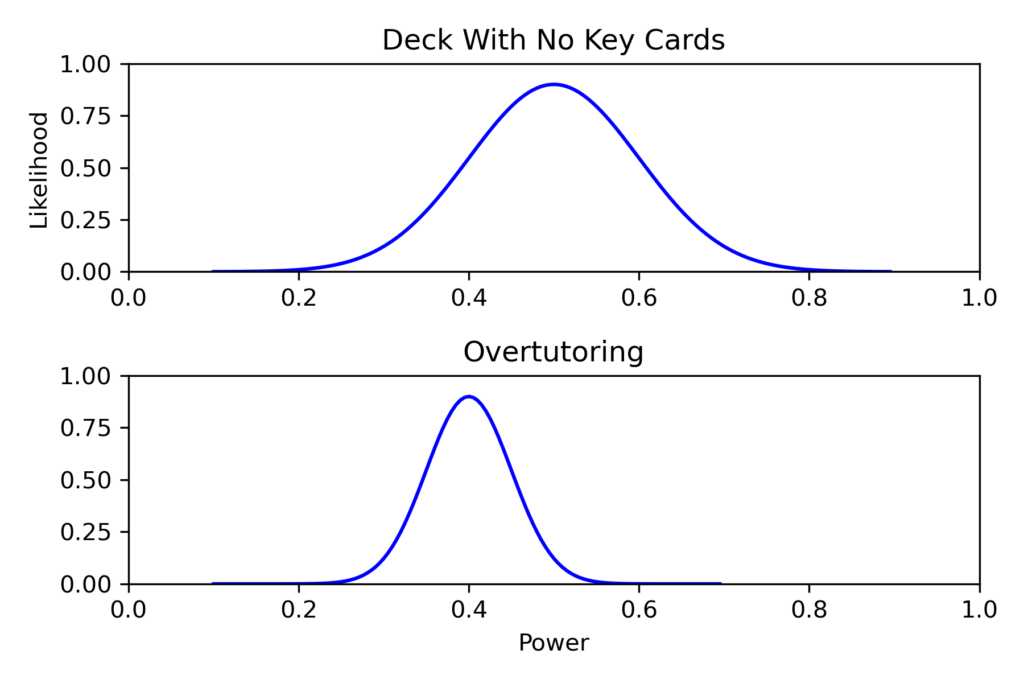
Consistency cards effectively remove raw power potential from the deck. They are justified only when some pieces are crucial to find, especially at the right time. This always applies to combo decks, no matter the matchup faced. High provision cost of consistency tools used in combo decks is a hidden way of keeping them in check.
Spreadability & Scaling
Let’s repeat. What does it take to make a Gwent deck well spreadable? Decisive round win condition (w-c) must be discoupled from the package winning another round. It is welcomed for the package to support w-c, but w-c couldn’t be indispensable to make the package work.
Spreadability and Scaling are closely related in practice.
- A deck scaling badly into a long round must be perfectly spreadable in order to play three rounds actively and shorten R3.
- A deck severely lacking points in a short round, but outstanding in long must win Round 1 at all costs – power spread into only 2 rounds is needed, but decoupling and provision investment into R1 must be huge (examples: Arachas Swarm Sabbath)
- A deck unable to spread enough resources for R1 (for example because of the bronze cards being generically inferior to meta), must scale well into every round length (examples: Warriors / Self-Wound)
- Perfect spreadability (3 rounds play) isn’t useful when the deck is unable to push R2 and scales badly into short round.
To fully exploit good short round scaling and spreadability, strong proactive plays are needed. Such plays are always openers in R2 push and have good, unconditional value in short R3.
To build a deck with good Scaling it is useful to think precisely about cards we would play in 4-, 7- and 10-cards long round. Thinking about 4- we would discover how important proactive high-end plays and polarization are, while 10-card should show us that a decent amount of Control tools is often obligatory.
Meta Examples (Feb 2024)
*provision and power values of some cards would differ from Feb state due to March patch. Decklists are accessible by clicking on images.
Monsters | Renfri Koshchey
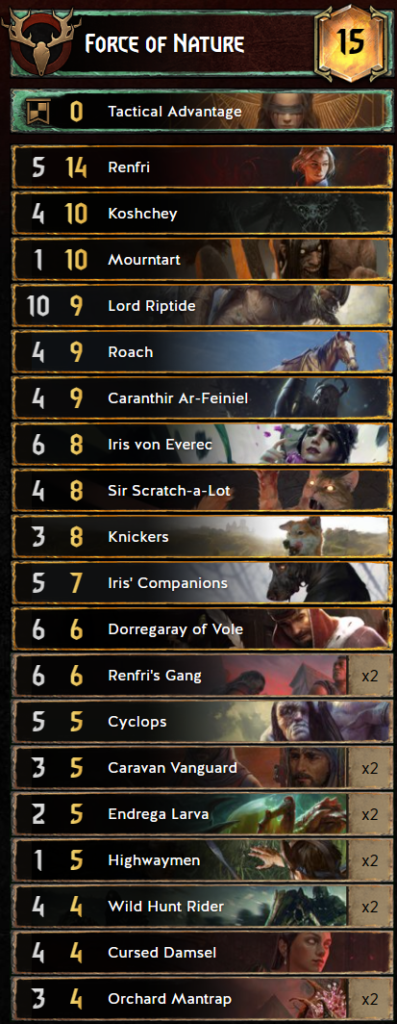
Koshchey combined with Caranthir, Sir Scratch-a-Lot and FoN leader ability is the main source of Points. Caranthir + Koshchey is a 2-cards combo – missing any one of two in time loses loads of points because Caranthir has no other similarly good target. For this reason we need to provide high consistency.
It could be done with tutors, but Renfri decks lack efficient options (Triss: Butterflies and Matta Hu’uri are low points). Instead we try to achieve perfect thinning: 7 cards thinned from the deck guarantee that every card is found in R3. That’s the secret reason behind running Iris Von Everec + Companions: not only carryover value is high in all-units deck, but also one crucial thinning is provided.
Koshchey, Larvas and thinning cards are perfect feed for Mourntart. This card grants better spreadability and scaling – Koshchey may be used to push or defend the bleed and Mourntart remains as a short round win-condition.
Flexible slots are used to provide the deck with control tools. Riptide, Cyclops and Dorregaray help to keep greedy opponent’s engines in check (although it is often possible to play around this control).
Control elements and Sir Scratch-a-Lot help to contest long rounds, which are slight weakness of the deck; first turns are weak due to Koshchey adrenaline restriction. Renfri Koshchey reaches peak performance in mid-length rounds (~6 cards) – long enough to setup Koshchey, short enough to not let the opponent develop engine board before Koshchey is deployed.
Nilfgaard | Imposter Aristocrats

Imposter Aristocrats points are located in powerful engines and threats. Only a part of the deck: Joachim + Coup combination, Usurper, Rosa&Edna and Masquerade Ball scale decently into a short round. Masquerade Ball is a powerful card, especially in a long round, but it impacts Spreadability in a negative way. When put under pressure, MB has to be committed with no tempo. The deck overall heavily prefers long rounds, where all synergies and engine value could get properly developed; also Imposter leader itself is great to seize initiative in a long round. Pointslam is located in the high end – the first round to win should preferably be long; otherwise the deck would have to commit short round win-condition cards.
Consequently, Aristocrats have to identify if to contest Round 1 deeply or pass early and get long enough Round 2 to defend the push well. The latter strategy also goes well with Ard Feainn location value, which would support R3 if committed only in R2.
Northern Realms | Inspired Zeal Demavend Mutagenerator
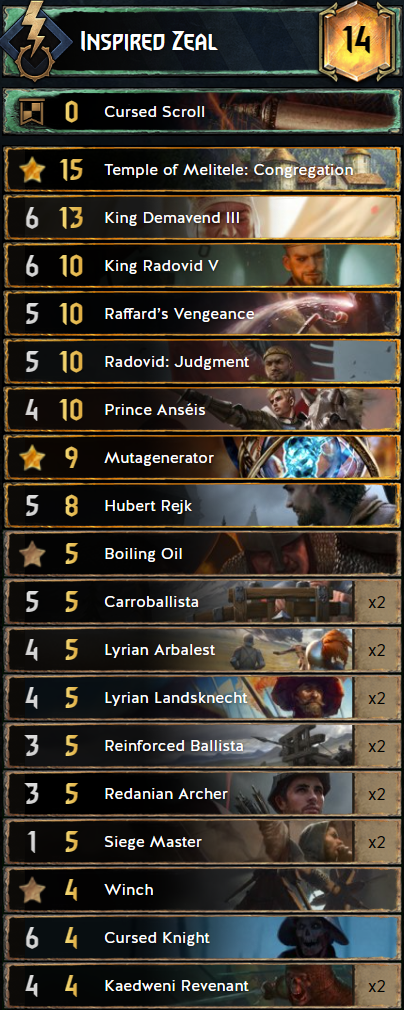
Points come from Mutagenerator and Temple Of Melitele first form combined with Prince Anseis as well as powerful threats King Demavend and Raffard’s Vengeance. The deck plays loads of engines and generally scales better into long round. The main short round trump is handbuffed Prince Anseis and Radovid: Judgement.
Consistency is a serious issue; finding Temple of Melitele and Mutagenerator early is important. Demavend is the only tutor for those cards. That’s why the deck runs Cursed Scroll.
Another slight weakness is limited control, but for Anseis. The deck generally needs to develop board first to establish efficient control with order damage.
Skellige | Patricidal Fury Warriors
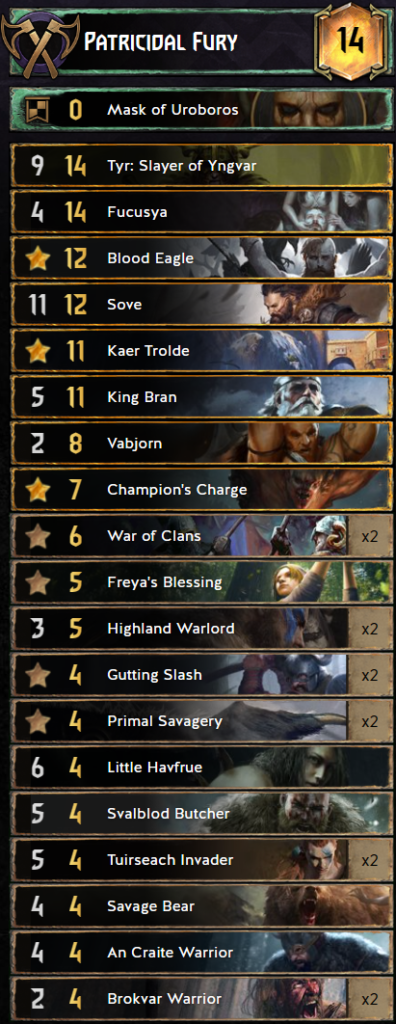
Points come from Tyr, Fucusya and Sove supported by Raids with Highland Warlords extra damage carryover.
Deck isn’t perfectly spreadable when it comes to Round 1; this round is mostly reserved to develop carryover with Highland Warlords. Interacting with opponent’s board and contesting the round may be troublesome. Against high tempo decks, losing on even from blue coin is a real threat.
Power is invested into two last rounds and deck scales very well into any round length – Sove and Tyr provide strong proactive plays, while Raids and Kaer Trolde bring efficient control for a long round. Thanks to location carryover and strong pointslam core, losing on even is often not the end of the world.
Scoia’tael | Nature’s Gift Symbiosis
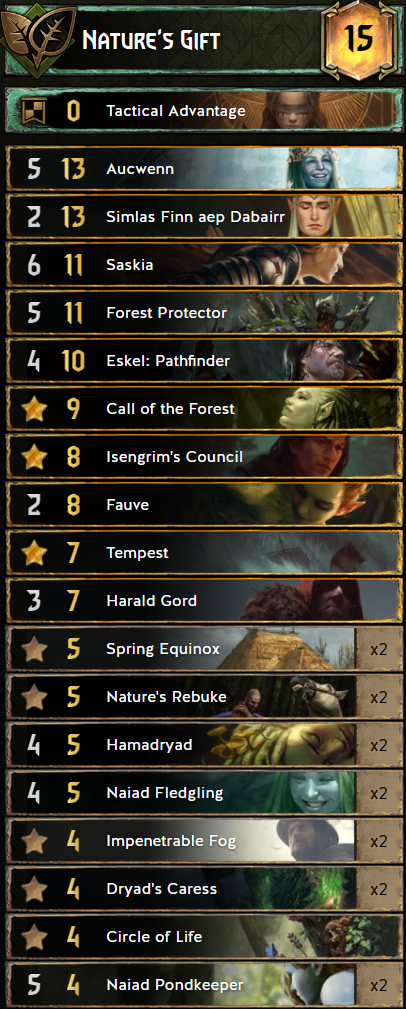
Simlas into 2x Spring Equinox is the main powerplay. Aucwenn is potentially a powerful engine, but in reality usually gets immediately answered.
Thanks to Symbiosis, it is possible to run Nature’s consistency cards: Call of the Forest and Isengrim’s Council not only to provide the consistency, but also direct value.
Bronze Symbiosis engines, especially Naiad Fledglings are the main source of long round scaling. That being said, the deck is not amazing in the control aspect whenever the opponent evades playing into the Rebuke range.
Deck is perfectly spreadable and with Tempest triggering Symbiosis three times could impact massive pressure in Round 1. Generally preferring first say for engines and a bit shorter rounds, Symbiosis would often push in Round 2 and thin out Spring Equinoxes with Simlas.
Syndicate | Jackpot Yago
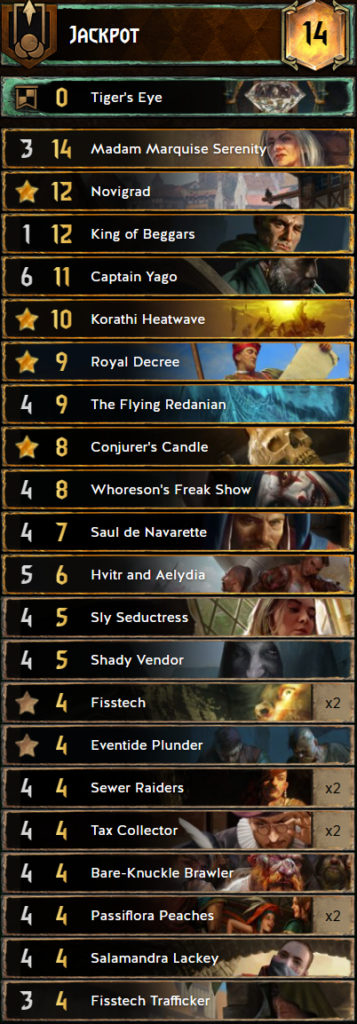
Madam + King of Beggars and Captain Yago are main sources of Points. Novigrad could also provide a formidable amount of points when played for carryover (~2 coins in pouch + 9 gain + random unit; often better value than double Ciri:Nova!). Power is spreadable into two rounds; one to win with Madam and decisive with Yago. With Yago/Madam having different characteristics (instant value vs long round engine), deck scales decently into each round length.
Whoreson’s Freak Show is a model example of Control investment at the expense of Points. Playing as raw 6 points for 8 cost, Whoreson’s Freak Show helps to keep the opponent’s threats in check. WFS is in a sense a reversed engine, getting value per turn for each engine removed. In this deck WFS is especially well fitting because of synergy with Yago – spender on the board not going tall and interfering with opponent’s plans.
Captain Yago and Madam are key cards. Especially Madam has to be found early because of engine character and double thinning. For this reason Royal Decree is a perfect consistency tool to use in this deck.
Summary
No surprise, but note how well all the showcased meta decks obey the main properties of good builds. But for ‘Points’ category, there could be small flaws (Control in Gift, R1 Spreadability in Warriors, short round Scaling in Aristocrats…), but those are never extreme and decks themselves often try to alleviate them with flexible card choice (Eskel/Geralt in Gift, Location carryover in Warriors, Usurper in Aristocrats, Cyclops in Renfri Koshchey).
Of course I hope that this article would encourage you to build your own decks, trying to excel as much as possible in all the mentioned aspects. Final takeouts:
- ‘Points’ first. Don’t build decks where win-con cards do not match or exceed meta power level.
- Think of long and short rounds, the exact cards you would like to play in order. Otherwise it is easy to not include enough proactive and control cards.
- Have a winning plan for more than one round.
- Decks relying on finding crucial pieces at the right time require extensive tutoring. When R1/R2 access is not this important and the number of outstanding R3 cards is very low and they don’t rely on each other, then tutors are likely of underwhelming value. Finally, some builds may try to achieve 7-cards thinning (thinning to 2 cards left in deck), which guarantees access to all cards in R3.
Have fun!