
Introduction
Gwent is distinguished amongst other digital card games by slow-paced, strategic character of duels between players. The main reason is three-rounds system. In the first two rounds, the pace of projecting points on the board matters to some extent, while in Round 3 it becomes completely irrelevant – only final points score is important.
Unlike some single round card games, like Hearthstone, tempo is never a win-condition by itself in Gwent: The Witcher Card Game. Tempo is only a tool which helps to achieve various mid-term objectives.
Also, due to round spread and pass mechanics, projecting enough points just at some crucial moments in Round 1 and Round 2 especially matters. Being able to close the point gap without overcommitment is called reach.
In this article we would try to develop deep understanding of Tempo and Reach in Gwent. To my best knowledge, there is little content available dedicated to this topic. There is a practical article about calculating reach by Lemon from Team Kreve: Maths & Reach – WLGYL#2 and a showcase on Tempo Management from Spryo.
Tempo
In Gwent tempo means number of points played on the board per turn. It includes damage done to enemy units.
Blue = ‘blue coin’ = player going first in Round 1
Red = ‘red coin’ = player going second
- Initial Tempo
Especially important is the number of points projected immediately – initial tempo. In this context usually term low/high tempo card is used. Initial tempo typically includes end of turn effects, as if player would pass in the next turn. For example Windhalm of Attre plays as 8 for 7 initial tempo, Eskel:Pathfinder as 8 for 9. While both of these exemplary cards could be countered in practice and play for less points than ‘initial tempo’, the definition assumes no instant reaction from opponent (for example immediate pass). Initial tempo defined this way is equivalent to reach value, which would be discussed later in the article.
The highest initial tempo cards are usually of pointslam type. Typical examples in Gwent 10.10 are Renfri’s Gang, Blightmaker into Mage Assassin or Mammuna into Griffin. The lowest initial tempo is typically exhibited by control/engine cards, like Gutting Slash and Dorregaray of Vole, or Redanian Knight and Antherion. For more detailed comparison of engine/pointslam/control value over time, have a look at the dedicated article.
- Developed Tempo
Some cards like Scenarios are often called high tempo in spite of low initial point output. In this case we mean average value reached right after the card basic effect got fully developed.
For practical purposes, a measure of 3 turns could be used. For example Feign Death, often played as R1 opener in Elves decks is worth 7(Vernossiel Commando)+6+6 = 19 points of developed tempo after full proc.
Developed tempo is important in an aggressive R2 push as well as a win on even attempt in Round 1 (would developed tempo be enough for Red player to close the point gap at 7 cards?).
Reach
Reach is the capability of getting ahead in points without overcommitment. Estimating the reach is one of the most important Gwent micro-skills (by micro-skills we mean solving problems over-the-board; tactics rather than general strategy/knowledge).
Another meaning of reach is simply the number of points which could be projected to get ahead without overcommitment. For example we could say that Renfi’s Gang gives a reach of 12 points (Gwent 10.10).
Reach may be direct (winning on even cards in Round 1 / getting card advantage), or splitted over multiple turns depending on particular problem considered.
How Round 1 Is Won?
If both sides benefit from winning Round 1, then Round 1 is won only by getting out of opponent’s reach. It doesn’t literally mean that opponent couldn’t get ahead with any cards from hand in any number of turns – remember the exact definition – getting ahead would simply mean too much commitment. With N unplayable cards left in hand after mulligan phase, player would land at zero reach if went down to N.
Red player counts own reach, while Blue player anticipates Red reach. Blue should let Red to establish direct reach only when sure to retrieve it later in the round – otherwise Blue loses Round 1 on even cards, which is in general a very unfavored position (have a look at the 1st chapter of Bleeding tutorial). In the context of Blue, losing reach has its literal meaning only in the case of the mentioned lose on even, while otherwise blue passess while still ahead because of anticipating opponent’s direct reach.
For example Blue is 1 point ahead and have Squirrel without target and 3 unplayable golds left in hand. Technically Blue still could play on with Squirrel and would be 5 points ahead after such play. In practice though, there is 99% chance red possess direct reach. In case Squirrel gets played, Red would win on even and Blue has no chance to defend themselves – zero reach due to no playable cards. Therefore, Blue anticipates the future and passes accepting Round 1 defeat.
Red player on the other hand needs to anticipate Blue pass and always be sure to have reach tools left in hand. In the example above, if Blue passed and Red happens to have only unplayable cards in hand, then Red forced commitment on themselves without any real benefit; they should have passed a turn earlier.
Blue: Wins the round when got out of Red reach; Passes when at risk of direct reach or when own playable cards got depleted.
Red: Wins the round if having reach when Blue passes.
Tempo, Reach and Round 1 Structure
The earliest time for Blue player to pass is at 7 cards (3 cards played from both sides). If having direct reach after such pass, Red will go into Round 2 a card down, if not – multiple cards down.
But for matchups with order advantage (where setting up the board first is beneficial), player going second is in favored position. They could react to blue plays and put just enough pressure to achieve Round 1 objectives. Therefore in Gwent Homecoming stratagems have been introduced to alleviate coinflip advantage of red player.
Blue player could choose one of 7 neutral stratagems, or opt for the unique factional one (Urn of Shadows – Monsters, Mask of Uroboros – Skellige…). Stratagem emerges on Blue side of the board at Round 1 start, with order ability to be used at will. Check out Red Coin & Blue Coin article from Team Kreve for some complementary information.
- Development profile
Preparation team based on engines develops slowly; at 7 cards checkpoint, only the first engine had the chance to develop full value. While the beginnings are slow, around 5 cards left in the deck, engines already start to prevail over pointslam unless controlled.
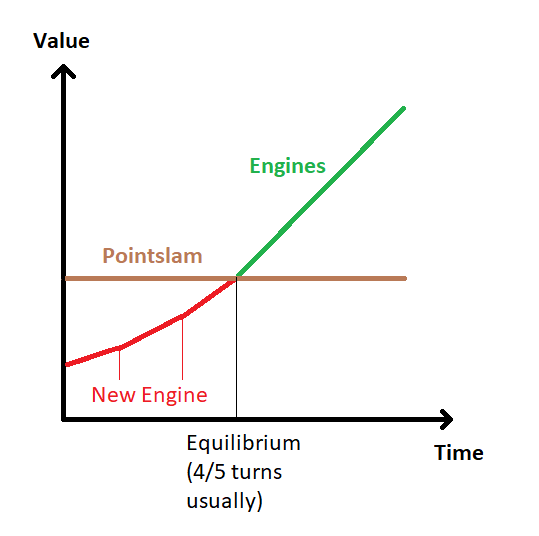
It is important to acknowledge own and opponent’s development profile and act in accordance with them. Don’t try to get ahead with precious pointslam tools unless having well developed board in an engine deck. Don’t commit everything to win round 1 against engine deck with pointslam if missing control tools – you would probably get outscaled while making bad trades on the path.
Under the ‘Engines’ label there are also included preparation + payoff decks, like Arachas Swarm with Arachas Nest / Spontaneous Evolution preparation and Chimeras / Bone Talisman payoff.
- Checkpoint 7
As said earlier, the first time blue coin player may consider passing is after blue and red played the 3rd card (7 cards left in the deck). Passing above 7 cards means losing Round 1 on even cards (both sides have 10 cards in Round 2 and Red player possess round control).
Then, 7 cards is the first time when points played by both players get confronted. As we know from development profile, an Engine deck shouldn’t worry when not ahead at this point. On the other hand, if Pointslam deck falls back in tempo on blue it could mean serious troubles.
The 10<=>7 period includes 4 turns (in the case of a pass at 7) in which 3 cards get played. 4 turns is exactly enough for the first engine to reach pointslam power vs provision curve (have a look at engines vs pointslam article).
A strong engine trading up in points to control present in the meta is a perfect opener for a win-on-even attempt. Note that blue player would usually refrain from playing similar engine in the first move (because of overcommitment), which gives a slight sequencing advantage. Typical examples here are Scenario cards, which could be fully proced at the Checkpoint 7 stage if played as the first card.
In the context of Checkpoint 7, cards joining the battle from the deck get their peak importance. Roach worth 4 points and Knickers worth 3 points could help to reduce Stratagem handicap. Especially the conjunction of these two is threatening; Red could get +2 tempo advantage at Checkpoint 7 proven that Blue plays no similar tools and Knickers jumps out early.
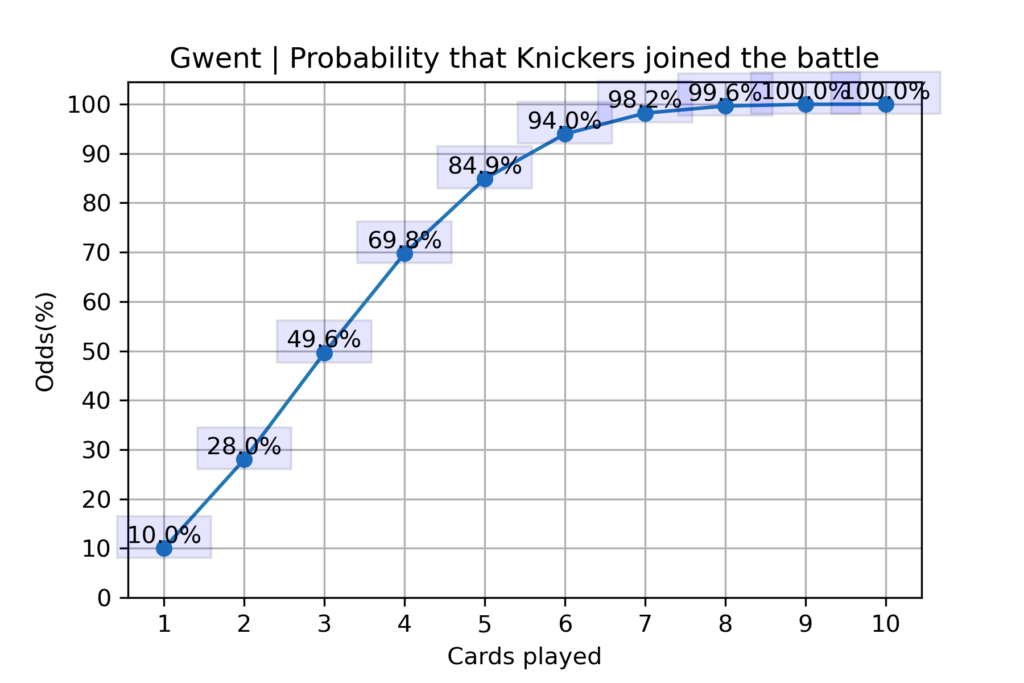
(Knickers behavior is described in the comments in the following Reddit post). As we can see, the odds that Knickers joins the field up to Checkpoint 7 are almost exactly 50%. Knickers mood could then easily decide if Red wins on even or not and whole game result could come down to a 50:50 on a minor, 8 provision gold (Gwent 10.10).
- Follow-up
If Red player is not having significant development profile disadvantage afer first moves, then direct reach becomes a big threat. As shown in the Bleeding&Pushing part of the tutorial, winning on even cards gives Red access to a variety of possibly game winning techniques.
While the main objective of getting ahead is winning on even cards, the immediate result is forcing Blue to play another card. Blue must play on, which could be especially troublesome at later stages of the round, when the number of playable cards becomes lower and lower. Using the direct reach then may lead to very favorable trades even when the main mission of winning on even cards isn’t accomplished.
If direct reach at the early stage of Round 1 means commitment, then Red have to make sure that playable cards left in hand guarantee follow-up in tempo. Low initial tempo cards become a burden. Playing them has to be avoided until point gap becomes big enough. For example a Knights deck trying to win on even cards should usually hoard Redanian Knight until development advantage guaranteed by Immortals + Damned Sorceress combo becomes big enough.
Without development advantage, low tempo cards are likely to spoil the win-on-even mission. If the low tempo card is of engine type, then Red could simply play it as a development investment, giving up the idea of getting ahead immediately, and commiting anything only when a better opportunity arises. If sticking to the immediate abuse plan, the depth of both hands playablility will be decisive. Blue may have similar low tempo problems and then Red burden card may get a window to be played. In general though, Red will hoard the card and try to at least make good trades thanks to forcing Blue into deep play. Burden card probably doesn’t get played at all.
- Checkpoint 5
After Blue plays the 5th card (5 cards left in hand), for the first time Red couldn’t go down more than one card to establish the reach (otherwise Red loses a card for a long Round 3 if Blue passes).
Red has to count the reach and decide if playing further is possible. If Red is ahead after playing the 5th card, then Blue should consider a pass to not risk direct loss of a card for a long round 3.
If Blue was unable to force out the Red player having a more progressive development profile at this point, then probably it wouldn’t be possible in the future.
- Bluffing The Reach
While Red player is supposed to count the reach available in hand and pass immediately when Blue goes beyond, sometimes bluffing the reach is the most correct play. The main objective is to make Blue play at least one more card; sometimes retrieving the reach would be possible in the next play, sometimes Blue would decide to commit a precious card to ensure Round 1 win, finally just shortening Round 2 by a card could be beneficial.
Blue calling the bluff would most often result in instant loss for Red. Therefore, the reach capabilities of Red must seem legit. In open decklists enviroment (exact lists known to both players), Red may for example pretend to have a tall punish card in hand, while in reality it wasn’t drawn.
In closed decklists, Red has to rely on opponent’s prediction of which card could be run and what not. Reach must seem probable.
Bluffing tends to work against Blue players who carelessly play another card instead of thinking of exact opponent’s reach, as well as cautious players, who take each possible danger into account. Gwent psychology plays a role here.
Overall, Bluffing is a risky technique, which should be used exclusively when passing leads to easy defeat. For an example of a correct bluff imagine a contest of a Pointslam deck with a single tall punish (e.g. Geralt of Rivia) against Passiflora Hidden Cache with Saul de Navarette. After 7 turns, Saul grows to 25 points. Nothing but Geralt of Rivia offers the reach, but unfortunately the card isn’t in hand. The game is played in open decklists, so Blue anticipates Geralt reach and have to play on after Red bluffs. Otherwise in Round 2 Blue would be in trouble, having to defend the bleed against Passiflora. Round 1 goes deeper; even if Red has to pass next, Round 2 and Round 3 got shortened by a turn, which effectively would mean ~+10 points of carryover in a pointslam vs engines matchup.
Tempo Pass
Tempo pass in its purest form means Blue projecting so many points in the first 3 cards (Checkpoint 7), that Red gets out of one card reach and have to go multiple cards down to catch up. In extreme, niche cases, blue could win Round 1 on even cards this way, or gain card advantage. The ‘sine qua non’ justification behind Tempo Pass is a favored long round, and it may be used especially if R1 development profile is less progressive than opponent’s. A model example of a successful tempo pass happened in Lifecoach vs TailBot match in the Quarterfinals of Gwent Masters 1 and is discussed here under ‘blue coin’ section.
Similar technique could be used at any stage of Round 1 when opportunity arises, but then Red gets a chance to pass first. Still such situations could occur quite often when fight for Round 1 is crucial for Red (R2 push is Red win condition).
In a normal game of Gwent, tempo pass would rarely be possible unless planned from the start. The point gap between two players is roughly equal to Stratagem value and the extra card played by red should easily cross the gap (4 provision meta bronze value is about 7 points in Gwent 10.10).
Cards joining from the deck, like Roach and Knickers, could help to Tempo Pass in the same way they helped to win on even at Checkpoint 7. Moreover, Knickers could function as a reach trap; opponent needs to get ahead by 4 points or more to play around random Knickers jump.
Roach alone increases the gap to strong bronze level (9 points) and with Knickers to gold level (12 points). The weaker reach cards in their hand, the more prone to tempo pass Red are.
Tempo In Round 2
The topic of Round 2 gameplay was already analyzed in details in three tutorial articles: Bleeding&Pushing Or How To Play Round 2, Types of Bleeds, Defending The Bleed, so this section would be very short to not repeat material.
Tempo means safety. The active player doesn’t have to be afraid of losing the card thanks to tempo shield, the defending player would feel safer if having strong reach card in hand. In Round 2 tempo could especially be exploited when your Development Profile is less progressive. Opponent may struggle to establish the reach while keeping natural order of development at the same time.
Reach Cards And Deckbuilding
Cards playing for high initial tempo with little conditionality are often called reach cards. Another property useful for reach cards is relatively low provision cost.
Reach cards usually are of the purest pointslam character, requiring short or no setup, sometimes even losing value over time in an intrinsic way or due to opponents reaction (Skjall, Yghern).
Let’s recapitulate possible reach card appliactions:
1) Threatening win on even cards in Round 1.
2) Closing the point gap in Round 1 after Blue pass with minimal cost.
3) Gaining card advantage when defending Round 2 push.
4) Or closing the gap in Round 2 after pass with minimal cost.
5) Establishing safe initial tempo when pushing in Round 2.
Not every faction has access to good reach cards in Gwent 10.10. Moreover, some cards like Nauzicaa Sergeant or Incubus, while potentially very strong, have some limitations (R2 push impossible for Sergeant / Round 1 use impossible for both usually).
Best reach effect is achieved in the mid provision range. Tempo then becomes significantly higher than low provision bronzes, but not at expense of spending a win-condition card from golden high-end. Let’s have a look at some examples of reach cards by faction.
Neutral: Renfri’s Gang, (Dwimveandra, Ciri:Nova)
Monsters: Yghern, Golyat (Incubus, Deathwish cards w. Giant Toad/leader)
Nilfgaard: Blightmaker, (Nauzicaa Sergeant, Spotter)
Northern Realms: Amphibious Assault (no real reach cards below golden high-end)
Skellige: Vildkaarl, Skjall, Birna/Coral with discard targets.
Scoia’tael: Frog Mating Season (…)
Syndicate: Many decent value bronzes, but no classical reach cards below high-end golds; Syndicate typically uses coins in the pouch with a spender as the reach, rather than simple pointslam.
(in brackets cards not obeying classical reach card definition, but nevertheless having similar application for some of 1-5 points).
As could be seen, the number of classical reach cards is rather low, and the value of those right now doesn’t seem to be outstanding. The strongest and most recognised of those cards is probably Renfri’s Gang (Gwent 10.10).

The power of this card is simply 12 points for 8 provision with some thinning carryover. Not the most broken pair of numbers ever. Nevertheless the card is perceived as very strong and some Redditors even suggested it deserves a nerf. What is the reason?
Renfri’s Gang thanks to immediate pointslam value provides great utility as a reach card and early tempo play before payoff cards start to achieve full potential. It offers enough tempo to threat win on even in many cases, especially against unaware opponent. During Round 2 push Renfri’s Gang provides safe tempo advantage, which for example let’s bleed out Mysteries of Loc Feiann scenario without losing a card.
At the same time, Renfri’s Gang played in a long Round 3 seems only decent; payoff cards like Cat Witcher Saboteurs, Keepers of the Flame or Chimeras probably would do similar or better points for lower provision cost. Not to mention engines like Antherions or Fleders going out of control. That’s a very typical characteristics of a reach card.
Including a reach card in a deck is not necessary. Sometimes high-end golds could be used in the same function, sometimes okay tempo cheap bronzes are enough. Without a reach card, deck loses some firepower at crucial Round 1 and Round 2 moments and is more linear to play. In most games there is no benefit from having more than just one reach card in hand; only the first one is very useful.
Imagine for example a Northern Realms deck not playing Amphibious Assault. Whenever subjected to point gap of ~10 points at early develpoment stage, such deck would have to commit a precious gold to get ahead. That’s one of the secrets behind the omnipresence of AA. At the moment AA is included and tutored well, there is way less reasons to include other tempo plays.
Other common use of ‘reach card’ term is situational – the card offering best reach in a given board state. Sometimes also a payoff card used to close the point gap when the board is already well developed. Or carryover card which couldn’t be answered after pass – She Who Knows, Ciri:Nova…
Closure
Hope that you enjoyed the lecture and learned something new about the underlying rules of Gwent: The Witcher Card Game. Reach and Tempo are the main dynamics of the game and a real challenge for your tactical skills!
As there were no suggestions for the next tutorial topic, the cycle would come to a concluding chapter soon, so that Tutorial will move into frozen state for some time after. Stay tuned…